Product Photography for Online Selling at Home
Proper prep and simple lighting turn any home into a professional product photography studio.

No lighting trick, no fancy background, no camera skill rescues a photo of something that wasn't ready to be photographed. Prep is the foundation. Everything else sits on top of it.
Here's what that actually looks like, by item type:
- Hard surfaces (ceramics, glass, metal, plastics): Wipe every smudge, fingerprint, and streak. For jewelry or glassware, wear gloves during handling. You will leave prints you cannot see until the photo is on your screen, and then you have to do the whole thing over.
- Fabric items: Steam or iron before shooting, no exceptions. A wrinkled shirt reads as neglected. The buyer has no idea it was folded in a drawer for six months. They just see wrinkles and assume the worst.
- Electronics and gadgets: Remove cables from the frame unless they're part of the sale. Show ports and buttons clearly. Buyers want to verify completeness from the photos alone, so they don't have to message you and wait.
- Small items and accessories: Use a lint roller. Arrange any included accessories (chargers, cases, manuals) deliberately in the frame rather than piling them in a corner like you forgot they existed.
One practical note that will save you from redoing everything: decide on your background and shooting surface before you start cleaning the item. Nothing wastes time like cleaning something, setting it down on the wrong surface, picking it up, and starting from scratch.
On condition honesty: prep is not about hiding flaws. It's about letting the item look its best version of itself. Clean it, then photograph the scuffs and wear separately in dedicated detail shots. Buyers who can see the flaw clearly in the listing don't leave negative feedback. Buyers who get surprised do.
How to get good light without buying anything
The single best light source most sellers have access to is already in their home. It's a window.
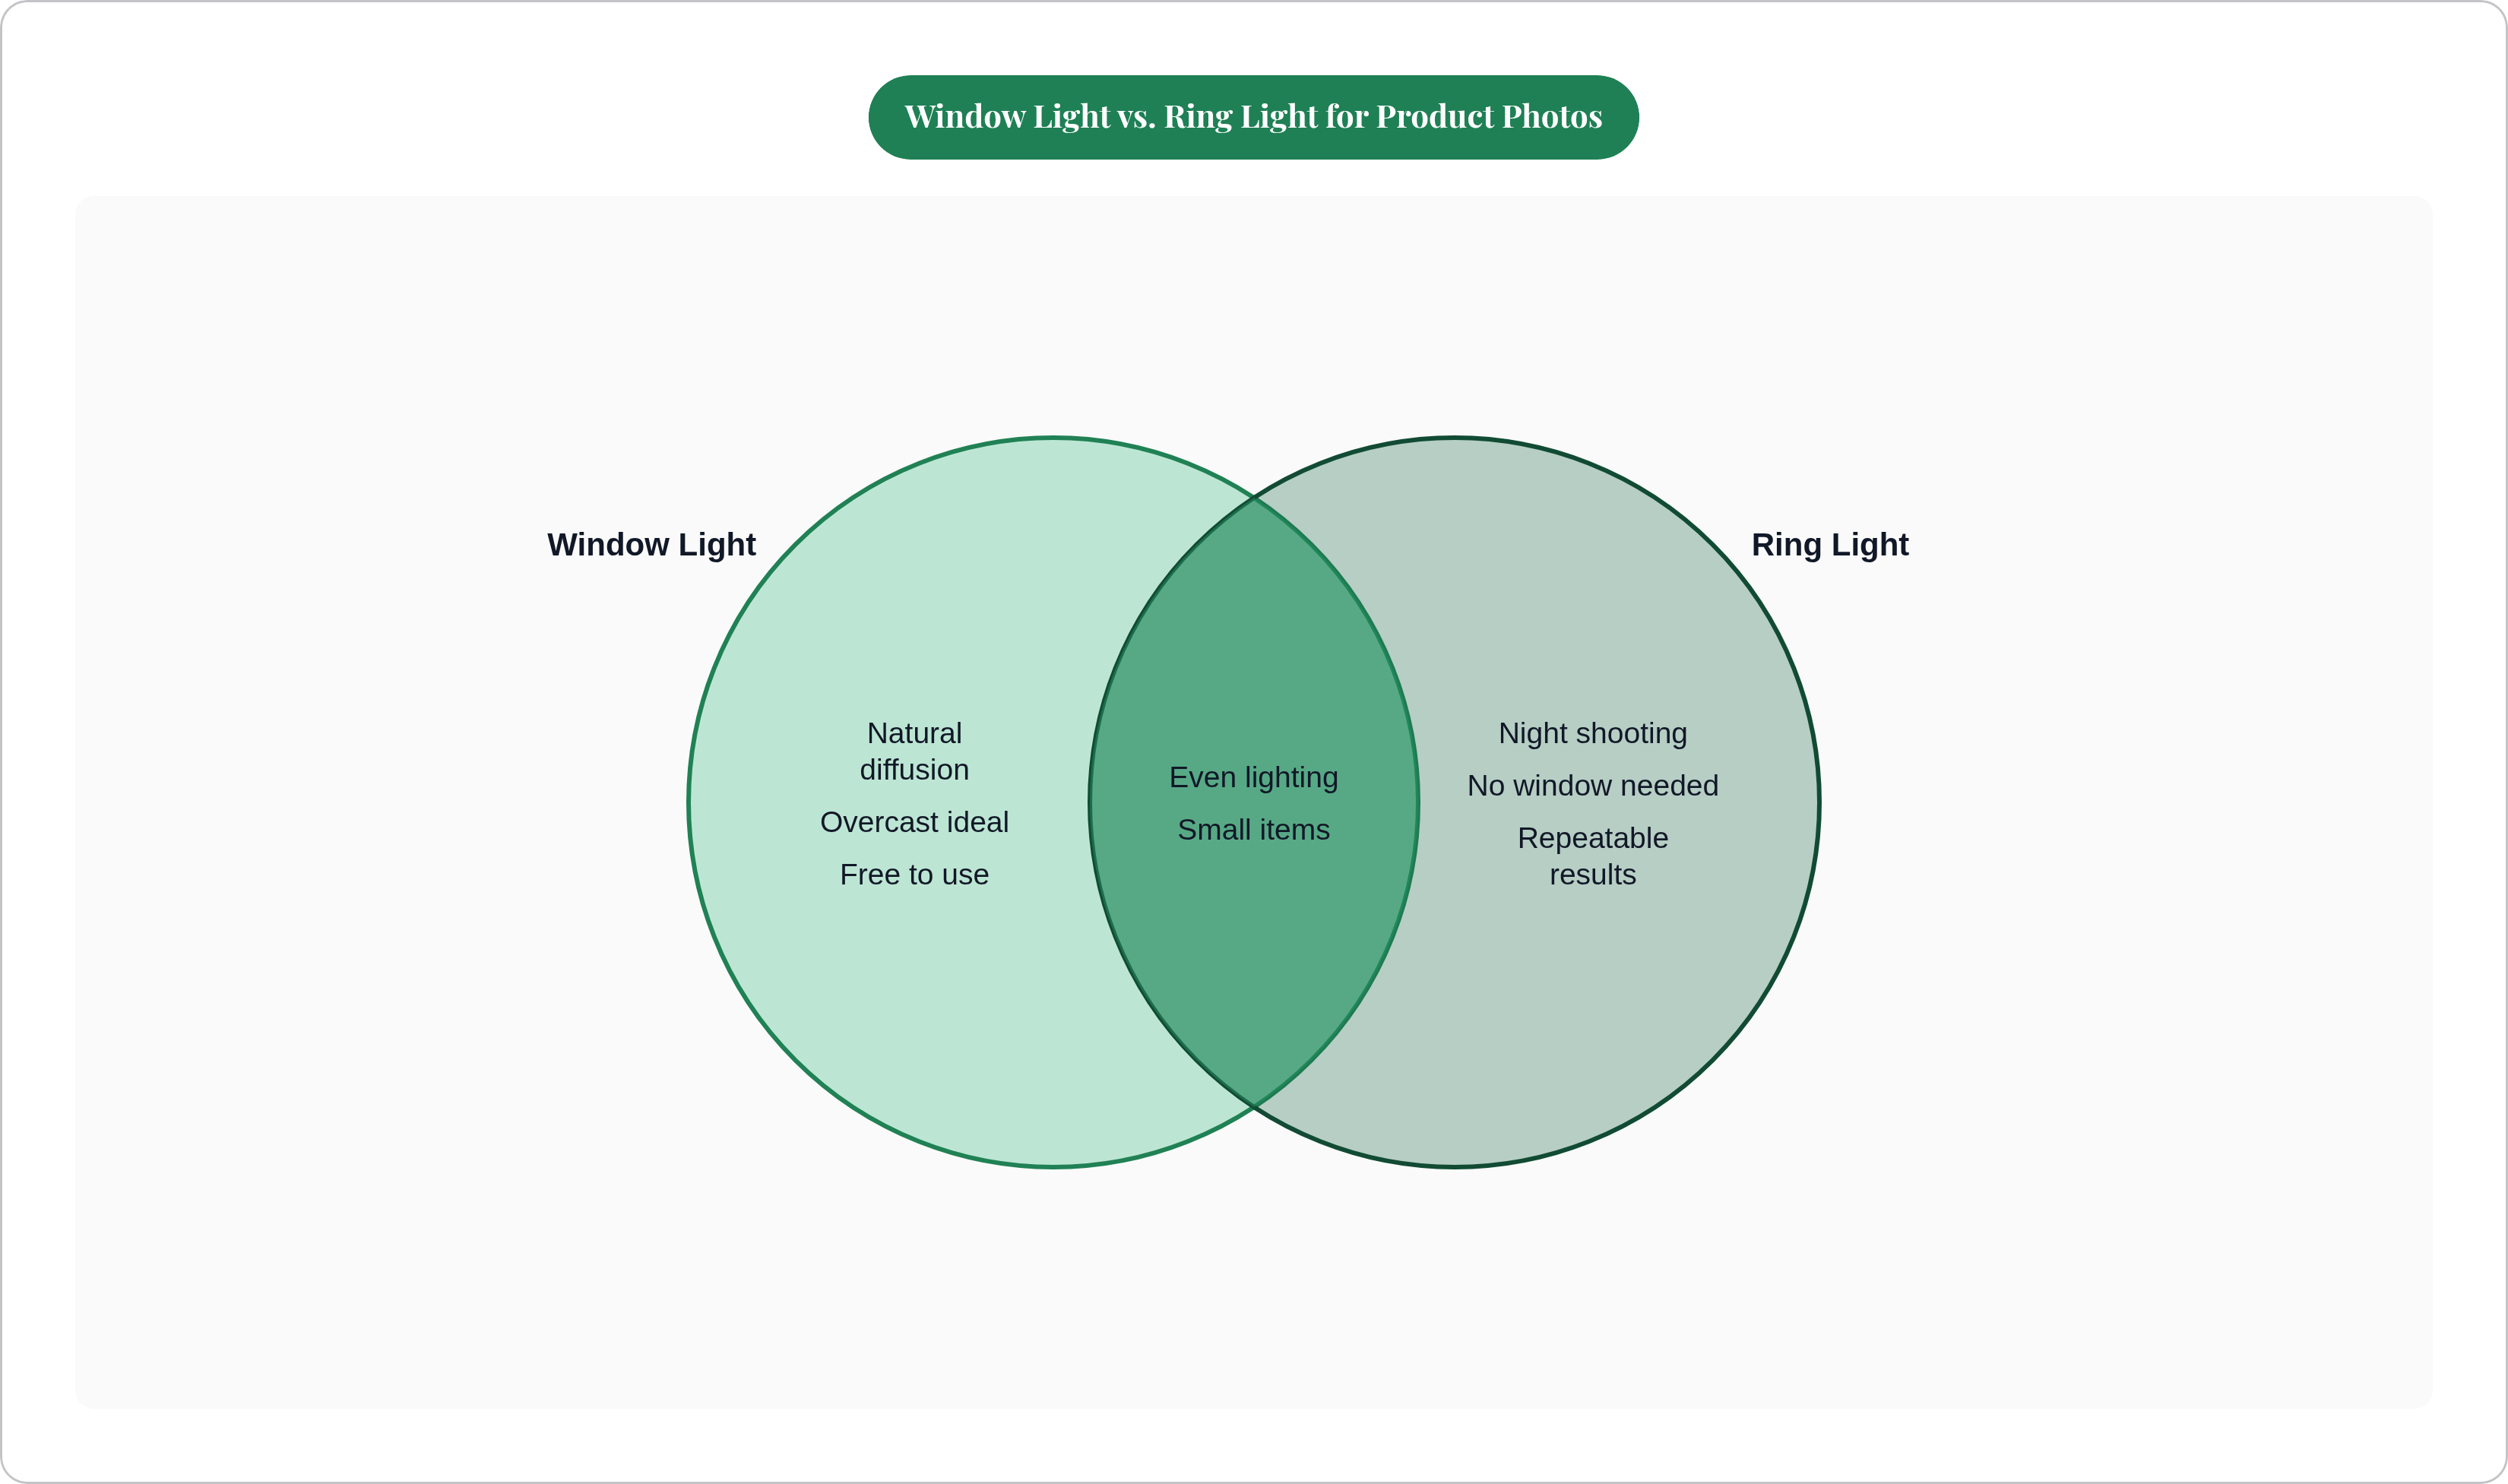
Position the item a few feet from a large window. Shoot on an overcast day if you can. Clouds act as a giant natural diffuser, and the light goes soft and even instead of harsh and directional. That's exactly what you want.
A few rules that apply every time:
- Light direction: Side or slightly in front of the item. Never behind it (that creates a silhouette) and never shoot directly into the window (that blows out the background and makes everything look like a crime scene photo).
- The free bounce card: Grab a piece of white foam board or even a sheet of white card stock and prop it on the opposite side of the item from the window. It bounces light back into the shadow side. This one trick kills the half-bright, half-dark look that immediately signals "I took this in thirty seconds." Costs nothing.
- What to avoid: Overhead ceiling lights alone create harsh downward shadows. Mixed lighting, a window plus a warm lamp, creates color casts that make neutral items look yellow or vaguely diseased. Pick one light source and stick with it.
A ring light makes sense in specific situations: the item is small (jewelry, small electronics), the room has no useful windows, or you're shooting at night when the window is useless. A ring light gives consistent, repeatable results across a whole batch of listings in a way that a window at 4 PM in January simply cannot.
The goal is not brightness. It's evenness. Soft, diffused light that wraps around the item from two sources (window plus bounce card, or two soft panels) is what makes something look like it was shot by someone who was paying attention.
Choosing a background that doesn't compete with the item
The background's only job is to stay out of the way. The moment something back there catches the eye, it competes with the item, and the perceived value drops. It's subtle and it's real.
Your options, roughly in order of effort and cost:
- White seamless: The default for most marketplace categories. Clean, professional, easy to pull off with a sheet of white poster board. Matches what eBay recommends and what Walmart Marketplace actually requires.
- Neutral flat surfaces: White foam board, large poster board, a clean light-colored wall. These cost nothing and beat a patterned bedspread every single time. There is genuinely no contest.
- Lifestyle surfaces (for the right item): A wood surface or a marble-look vinyl sheet adds warmth and context for home goods, kitchenware, or clothing accessories. Still needs to be clean and free of clutter within the frame. Works well in some categories and reads as odd in others, so use some judgment here.
- DIY lightbox for small items: A cardboard box lined with white paper, open on one side for the lens. Diffuses light, creates a consistent background, costs almost nothing. Works well for jewelry, small collectibles, and small electronics.
What to actually avoid: busy patterns, visible floor carpet, random laundry in the background, or anything that places the item in a cluttered domestic setting. A wrinkled bedspread in the background is basically a visual signal that says "I am not confident in this price." That signal travels.
Platform-specific note: Walmart Marketplace (as of their July 2025 updated requirements) requires a seamless white background at RGB 255/255/255 for main images. If you're listing there, white board is not optional. It's a requirement.
Which angles to shoot and in what order
Think about what a buyer needs to see before they feel confident enough to actually purchase. What does it look like straight on? What's the back like? Are there any flaws? How big is it? Your photos should answer all of those questions without the buyer having to send you a message.
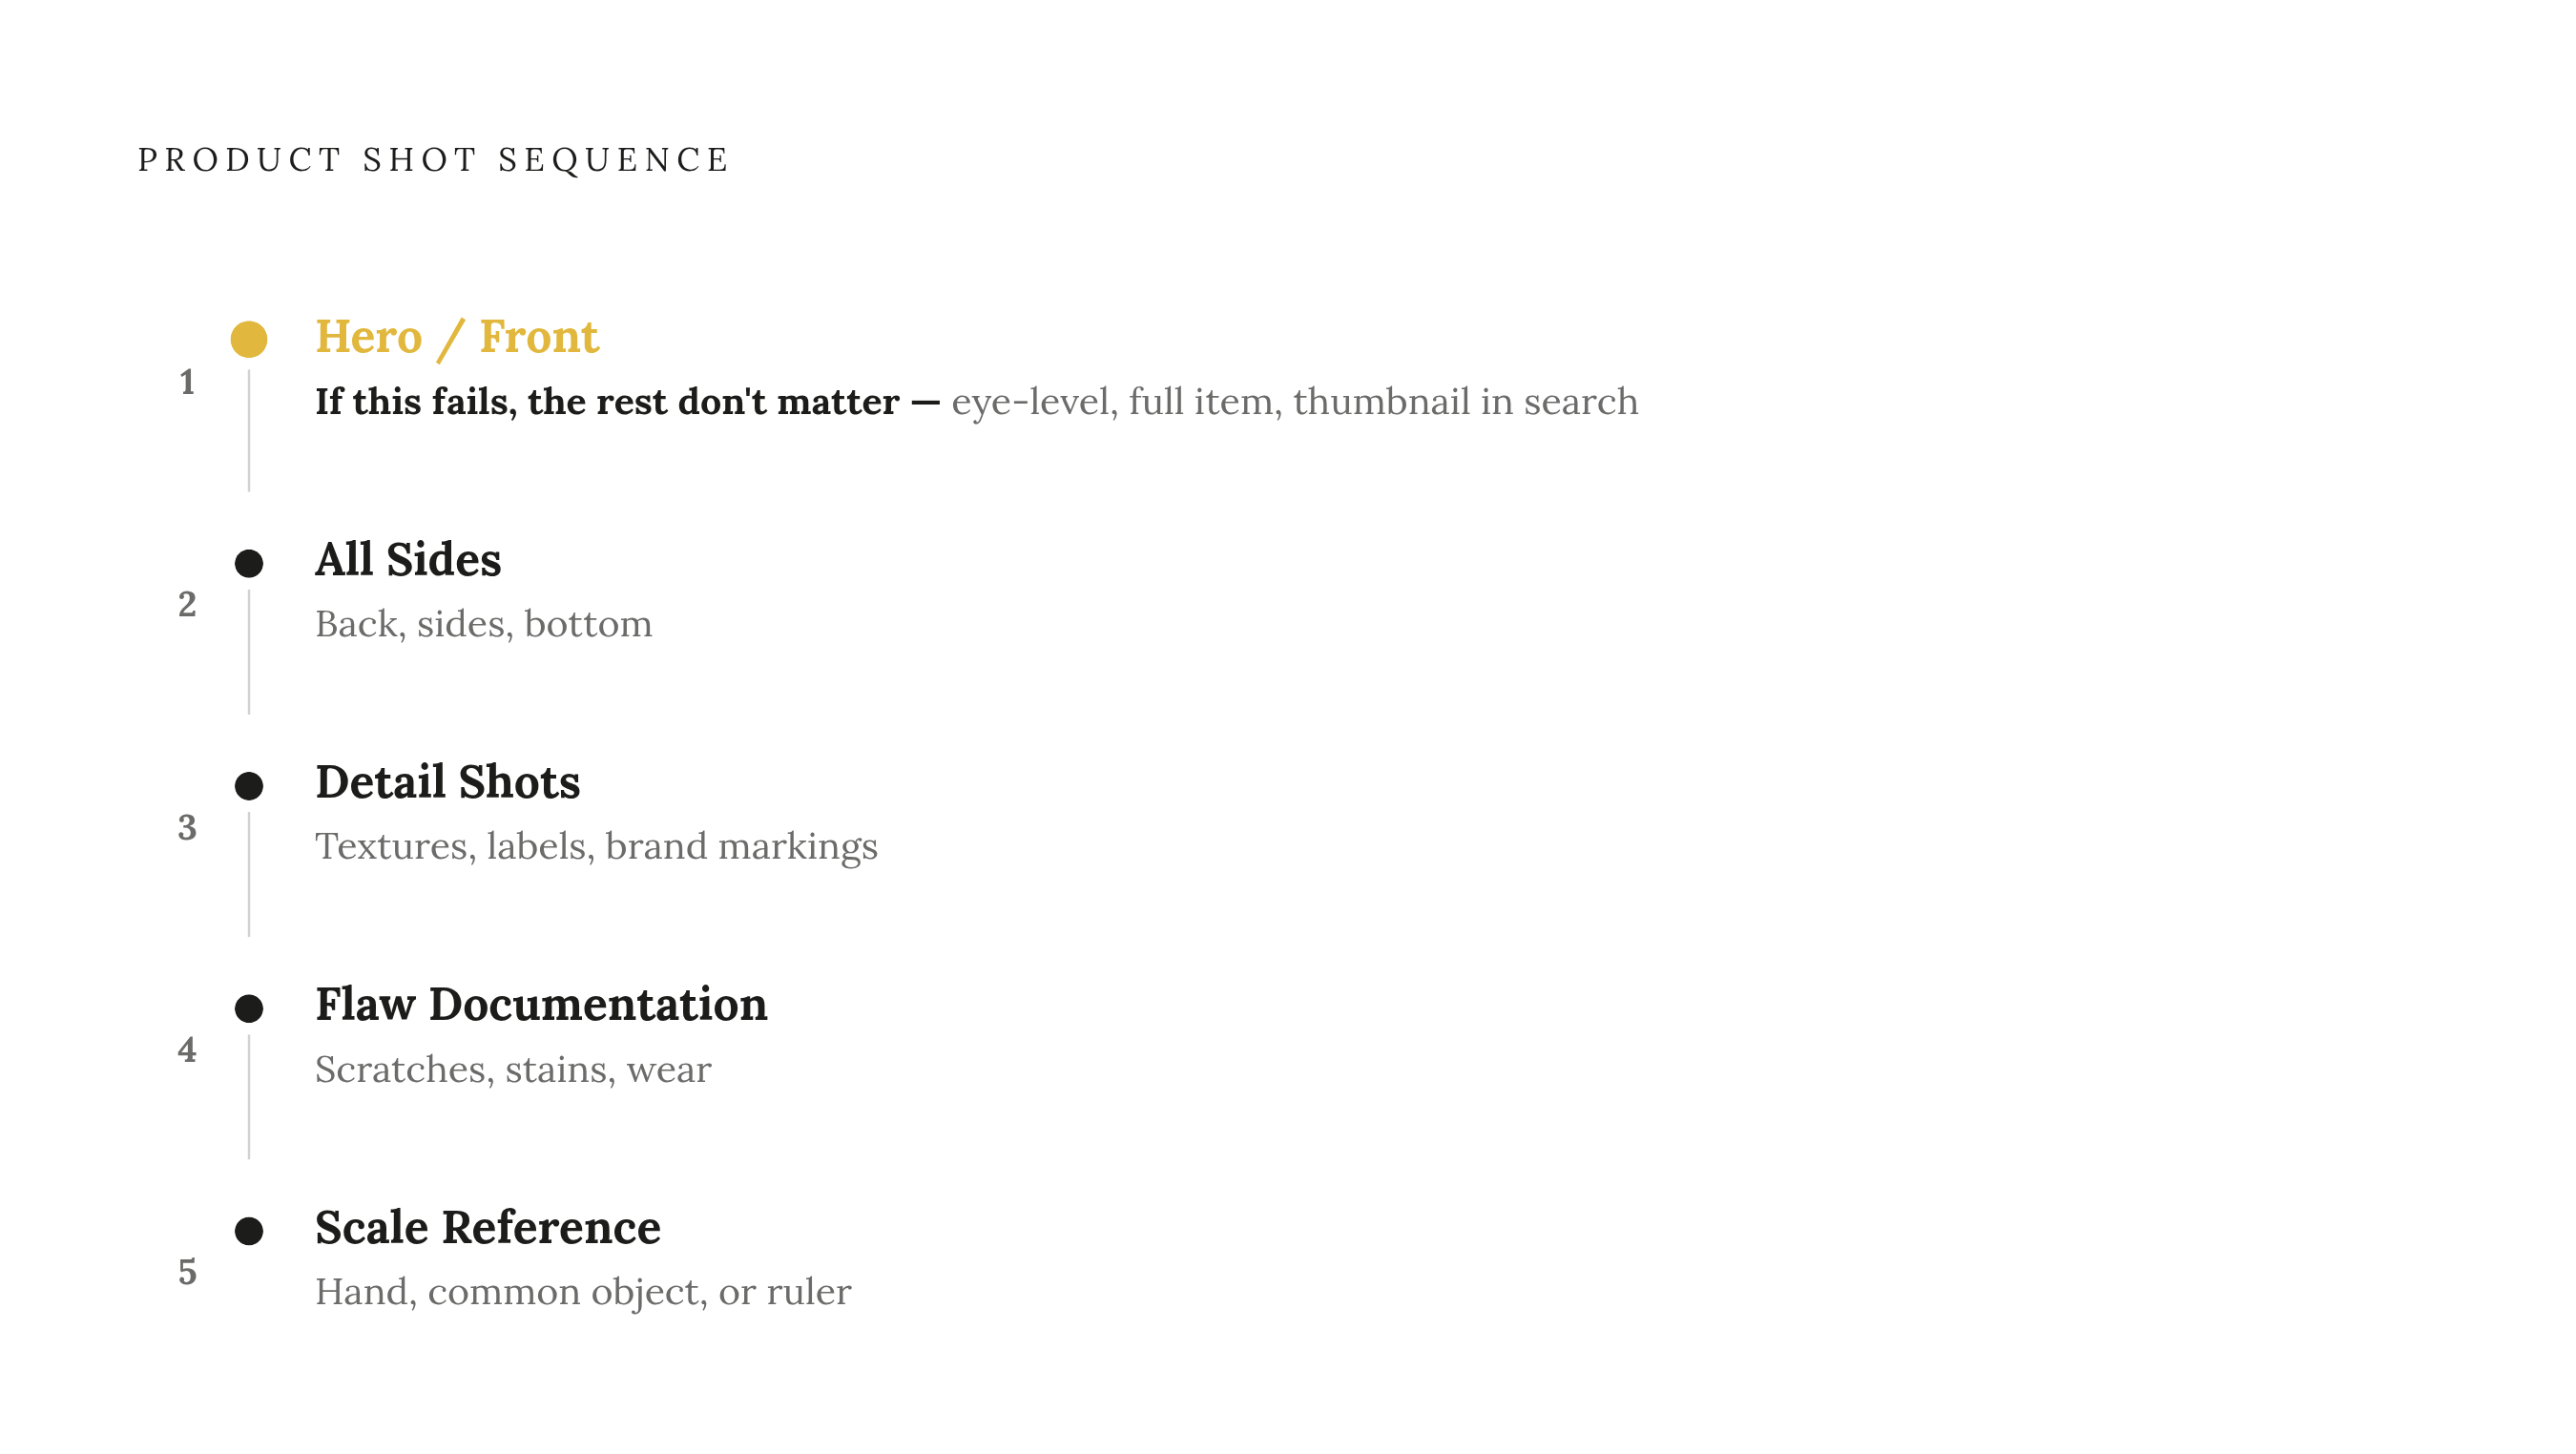
Here's the shot sequence that works for almost any item:
- Hero / front shot: Eye-level, centered, full item in frame. This is the thumbnail buyers see in search results, and it needs to be your strongest single image. If this one isn't good, the others don't matter much.
- All sides: Back, sides, and bottom where relevant. Especially important for clothing, shoes, electronics, and anything with ports, labels, or wear patterns you wouldn't see from the front.
- Detail shots: Close-ups of textures, hardware, labels, serial numbers, or brand markings. These establish authenticity and condition without a buyer having to ask you to prove it.
- Flaw documentation: Deliberate close-ups of any scratches, stains, or wear. This protects you from returns and shows buyers the listing is being straight with them.
- Scale reference: Item held in a hand, placed next to a common object, or next to a ruler. Buyers genuinely cannot judge size from a thumbnail, and size surprises are one of the most common reasons for returns.
A few category-specific things worth knowing:
- Clothing and accessories: Flat-lay (overhead, on a clean surface) or hung against a neutral background. Always include label shots and any stretch or wear detail.
- Electronics and gadgets: Hero shot of the main screen or face; all ports visible; a power-on shot if the item functions. That last one carries real weight with buyers.
- Collectibles and trading cards: Close-up under even light to show surface condition without glare. Include any certification or grading label if present.
- Home goods: A lifestyle-adjacent shot on a neutral surface, showing the item in context, helps buyers picture it in their own space.
If the platform supports short video, a 5 to 15 second rotation or power-on clip often outperforms still images for electronics and mechanical items. It's worth the extra 30 seconds.
Shooting with a smartphone without producing a smartphone-looking photo
The equipment question is largely settled. A modern smartphone, an iPhone 15 or a Google Pixel 8 Pro, can produce results that are genuinely indistinguishable from an entry-level mirrorless camera when lighting and angles are handled correctly. The camera isn't the problem.
What actually makes a phone photo look like a phone photo:
- Shot handheld at arm's length with no thought given to angle
- Auto-mode cranking up sharpening and oversaturation to compensate
- Shot in portrait orientation when the item is wide, or landscape when the marketplace requires square framing
- Digital zoom used instead of just moving closer (always step closer rather than pinch-to-zoom, which destroys detail in a way you can't fix later)
Settings worth adjusting before you start:
- Turn off HDR or use it selectively. It often creates unnaturally flattened exposures that look processed in a way you can't quite put your finger on but can definitely feel.
- Lock exposure by tapping on the item itself before you shoot.
- Use a $10 to $15 tabletop tripod, or just prop the phone against a stack of books. Camera shake quietly ruins otherwise decent product shots all the time.
A stable mount is the single cheapest upgrade that most improves consistency across a batch of listings, especially when you're shooting a lot of items in one session.
One habit worth building: before you upload anything, pull the image up on your phone screen at thumbnail size. If you can't clearly identify the item at that scale, your buyer can't either. Most online shopping happens on mobile, and buyers scroll fast. If the thumbnail doesn't stop them, nothing else gets a chance.
On portrait mode: it's useful for lifestyle shots but often artificially blurs the edges of flat items in ways that look strange. Use standard photo mode for most product shots.
Editing photos to listing-ready without over-processing them
The ceiling for editing resale photos is straightforward: correct, don't fabricate. A photo that misrepresents color, digitally removes real wear, or adds a crispness the item doesn't actually have in person invites returns and negative feedback. The edit's job is accuracy, not flattery.
The three adjustments that actually matter:
- Exposure: Brighten if the item looks underlit. Stop before you blow out highlights on white or metallic surfaces, because once that detail is gone, it's gone.
- White balance / color temperature: Neutralize any yellow or blue cast so the item's true color comes through. This matters most for clothing and anything with a screen.
- Crop and straighten: Remove background creep, center the item, and make sure the horizon is level. A crooked product shot looks sloppy in a way buyers notice without knowing why.
Tools that handle all three without a learning curve:
- Snapseed (free, mobile): Fast, intuitive, handles exposure and white balance cleanly.
- Adobe Lightroom Mobile (free tier): The free version covers the basics and gives more precise color control when you need it.
- Canva: Useful for quick resizing to marketplace specs if export settings feel confusing.
AI background removal has gotten genuinely useful for sellers who can't build a proper backdrop at home. Photoroom is the most widely cited tool for this. It lets you swap a cluttered background for clean white in a few seconds. Where it actually earns its keep is in legitimately difficult shooting situations. Where it can't help: fixing a blurry shot, restoring detail lost to compression, or making a photo show a condition the item doesn't have.
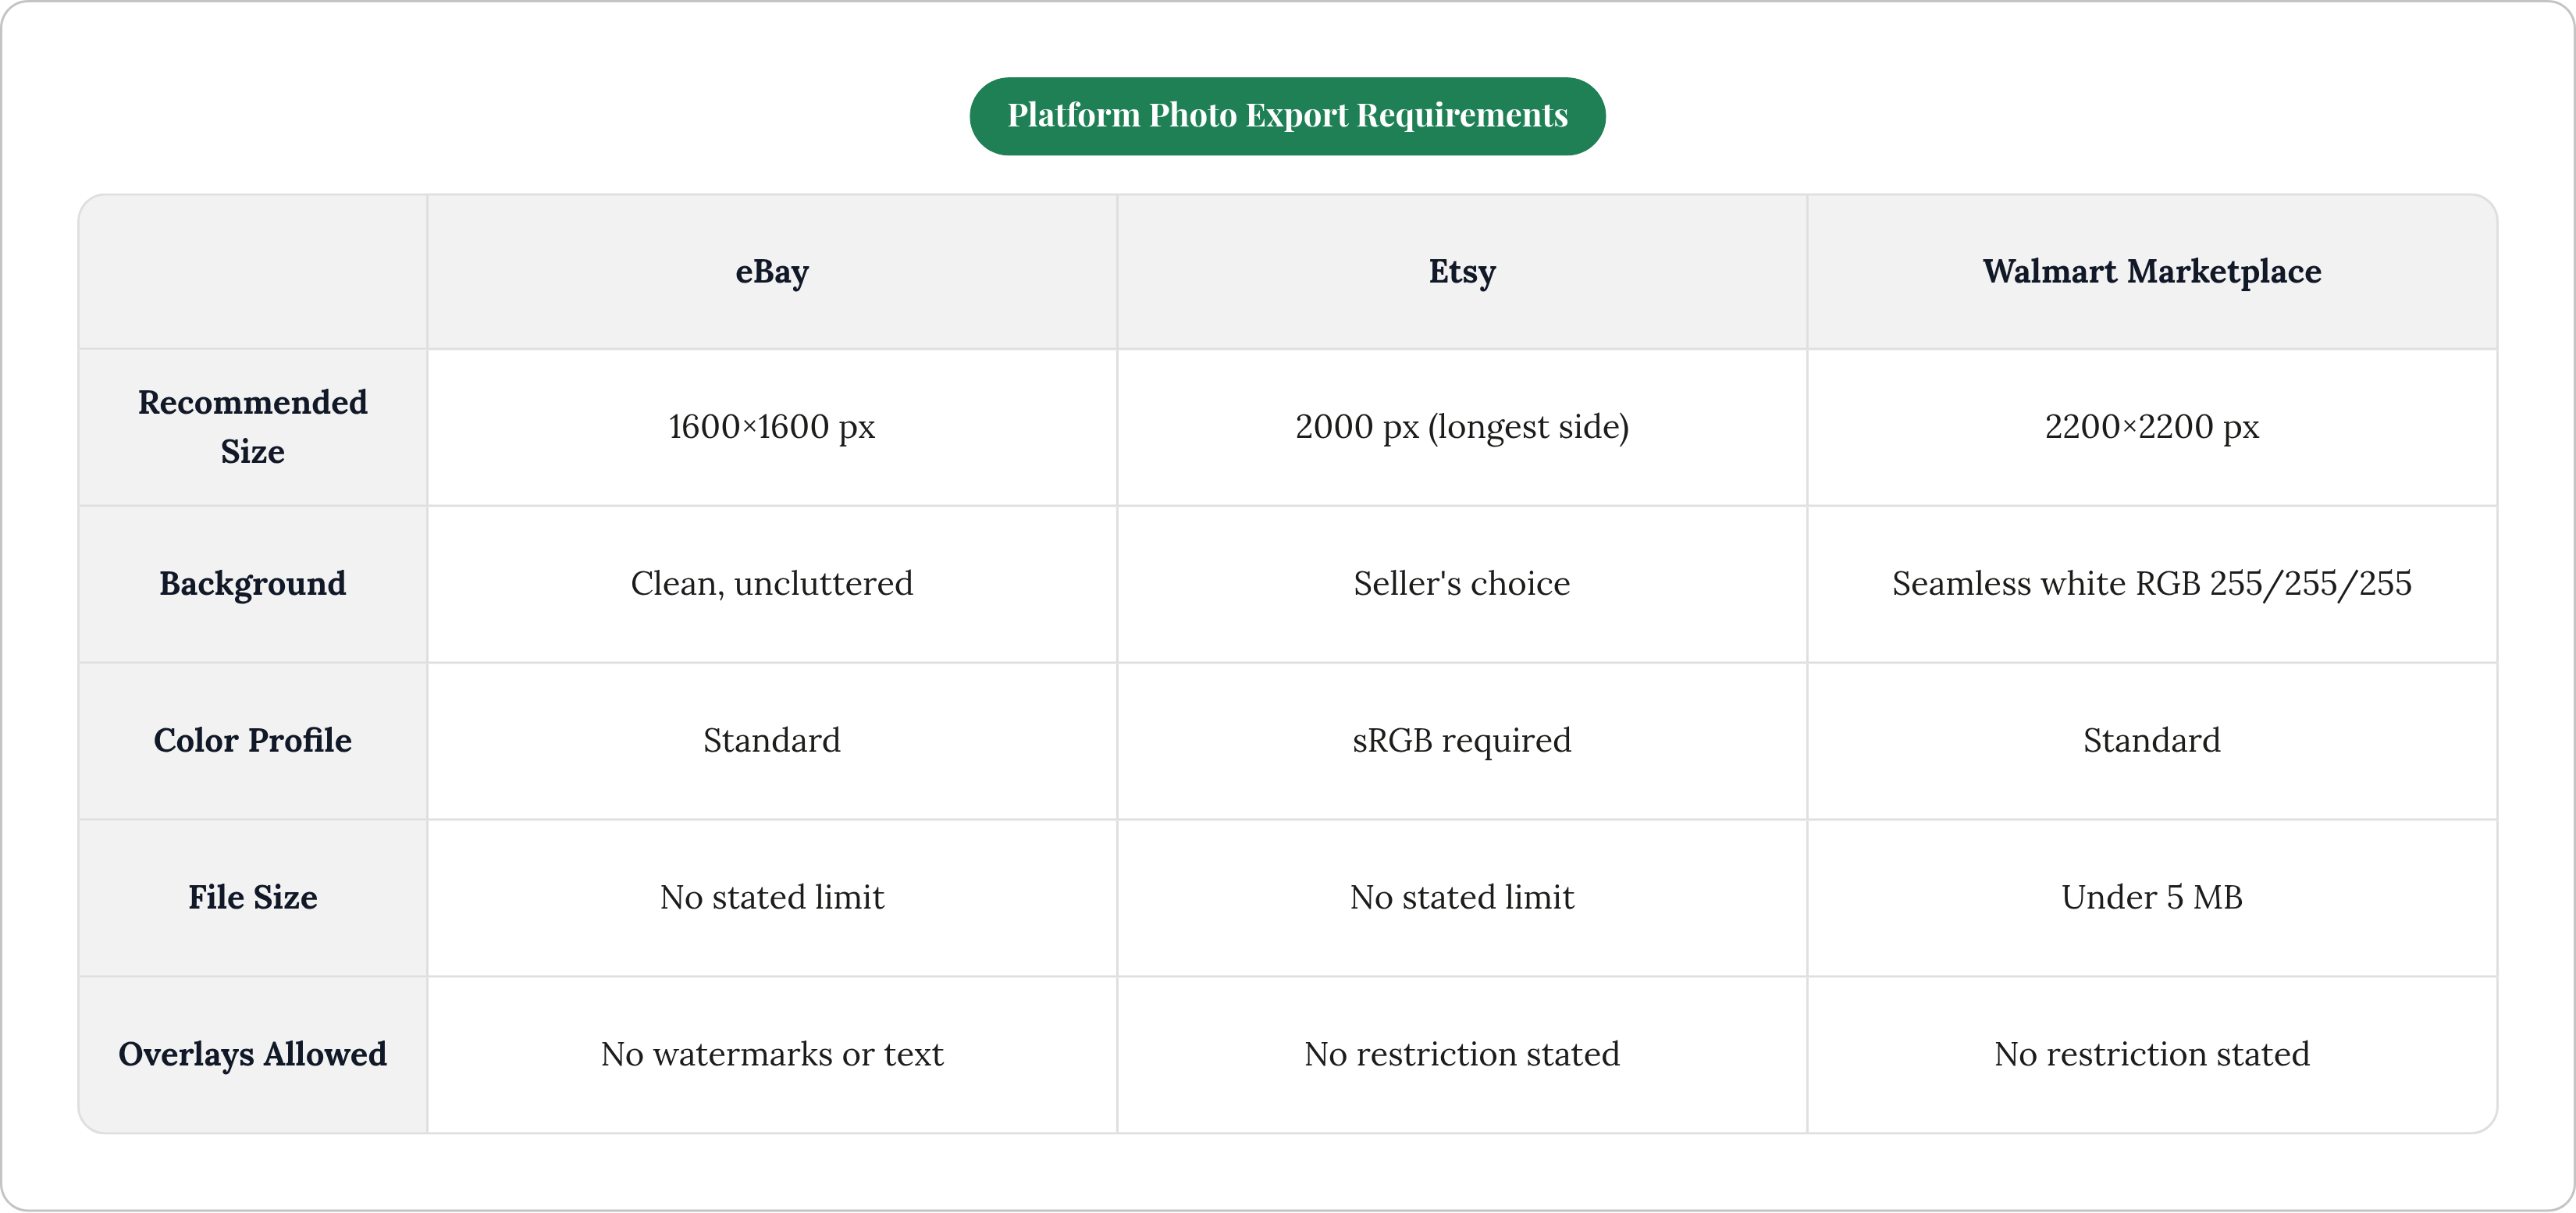
Platform export specs worth keeping somewhere handy:
- eBay: 1600x1600 px recommended; no watermarks or text overlays
- Etsy: At least 2000 px on the longest side; sRGB color profile
- Walmart Marketplace: 2200x2200 px; seamless white at RGB 255/255/255; file under 5 MB
How better photos connect directly to the price you can ask
The link between photo quality and final selling price is not a theory. It shows up in sold listings, consistently, across categories.
A well-lit, cleanly backgrounded photo with clear detail shots signals a careful seller. That signal earns the top of the sold-price range for whatever condition grade the item is in. A blurry, dark photo of an item that's actually in excellent shape earns Used-grade prices, because buyers price uncertainty into their offer. They're not trying to lowball you out of spite. They just can't tell what they're getting, so they pay for what they can confirm.
Pricing should always start with sold listings, not active ones. The gap between what sellers ask and what actually clears on eBay regularly runs 30 to 80% higher than real transaction prices. A seller anchored to active listings is pricing against fantasy.
When you pull comps, condition grade has to match. Compare like-condition sold listings, not a mix. A photo that clearly shows Very Good condition lets you price at Very Good comps. A vague photo that could be Very Good or could be Acceptable forces buyers to assume Acceptable. You've already left money on the table before anyone's made an offer.
In practice, the workflow looks like this: search sold listings on eBay (filter by Sold Items, last 90 days), find where well-photographed listings of the same item and condition actually landed, and price there. Your photo is doing two jobs at once. It's making the visual case for the price, and it's documenting the condition that justifies the comp you're using.
Some AI-assisted tools compress this workflow further, taking a photo and using it to identify the item, assess condition, and draft the listing from that single image. The photograph that earns top-of-range pricing also builds the listing, which cuts the friction that keeps most casual sellers from ever getting started. The secondhand market sits at over $207 billion in 2025 and keeps growing. Sellers who get presentation right aren't just doing better on individual items. They're competing effectively in a market that's moving fast. The photo is the entry fee.